🕶️
NRSDK(Old)
New DocumentationSDK DownloadAPI Reference
v2.2.1
v2.2.1
  • NRSDK Fundamentals
    • NRSDK Overview
    • XREAL Devices
      • XREAL Glasses
      • Controller
      • Compatibility
    • Getting Started with NRSDK
    • Sample Code
    • Tutorials
    • Release Note
      • NRSDK 2.2.1
      • NRSDK 2.2.0
      • NRSDK 2.1.1
      • NRSDK 2.1.0
      • NRSDK 1.10.2
      • NRSDK 1.9.5
      • NRSDK 1.9.3
      • NRSDK 1.9.1
      • NRSDK 1.8.0
      • NRSDK 1.7.0
      • NRSDK 1.6.0
  • Development
    • Input and Camera
      • NRInput
      • Interact with Unity UI (Tutorial)
      • Customize Controller UI
      • NRCameraRig
    • Hand Tracking
    • Image Tracking
      • XREAL Markers
    • Plane Detection (Tutorial)
      • Overview
      • Import the package
      • Detect planes in the real world
      • Perform a hit test against detected planes
      • Add a car
      • Add gems
      • Wrap up
    • Depth Mesh
      • Meshing Manager Overview
      • Use Meshes in the Editor
      • Tutorial: Mesh Collision
    • Spatial Anchor
      • Mapping Example Scene
      • Tutorial: Halloween Treasure Hunt
        • Handle the Situation of Failed Anchor Saving
      • Tutorial: Sharing Anchors
        • Setting Up Photon
        • Cloud Storage: Firebase (optional)
        • Cloud Storage: Aliyun OSS (optional)
        • Implementing Cloud Save and Load
        • Sharing Anchors with Photon
    • Tools
      • Single Pass Stereo Rendering
      • First Person View
      • Emulator
      • XR Streaming
      • Dual Screen Display
    • Miscellaneous
      • Access RGB Camera
      • NRSDK Coordinate Systems
      • MRTK2 Integration
      • MRTK3 Integration
      • Notification popup
      • Reset Camera
      • Render Metrics
      • Render MonoMode(Obsolete)
  • API Reference
  • Frequently Asked Questions
  • Design Guide
    • Design Guide Overview
    • Displaying
    • Interacting
    • Controlling
    • Navigating
Powered by GitBook
On this page
  • 1. Install photon
  • 2. Set up Photon in Unity
  • 3. Joining a room

Was this helpful?

  1. Development
  2. Spatial Anchor
  3. Tutorial: Sharing Anchors

Setting Up Photon

PreviousTutorial: Sharing AnchorsNextCloud Storage: Firebase (optional)

Last updated 1 year ago

Was this helpful?

1. Install photon

Search for Photon Unity Networking in the Unity Asset Store, then download and import it into your project. (Note whether you are downloading PUN1 or PUN2. This tutorial uses PUN2, as there may be some compatibility issues with PUN1. It is recommended to use PUN2).

Pay attention to resolving issues related to assemblies.

  • Open the assembly of NRSDK.

  • Find the "Assembly Definition References" section and click the "+" button to add a new reference. In the new reference, select the Photon assembly PhotonUnityNetworking and PhotonRealtime. Click the "Apply" button to save your changes.

2. Set up Photon in Unity

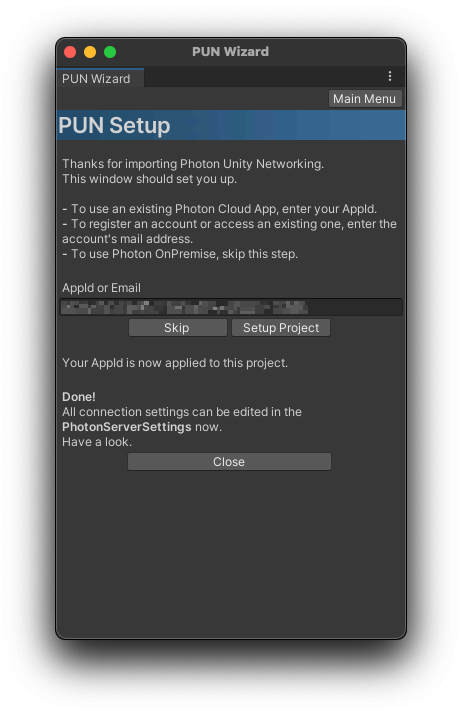
  1. In Unity, open PhotonServerSettings (Window > Photon Unity Networking), and then enter your App ID.

  1. Start "PhotonControl.exe" and confirm the admin rights for this application. They are needed for the option to set up Photon as a Service. Look out for the tray-bar icon (bottom right by default). Click the white/grey icon to open a menu that controls Photon.

  2. Pick LoadBalancing (MyCloud) from the Photon Instances and "Start as Application". Now you started Photon.

  3. Now you can connect clients running on the same machine.

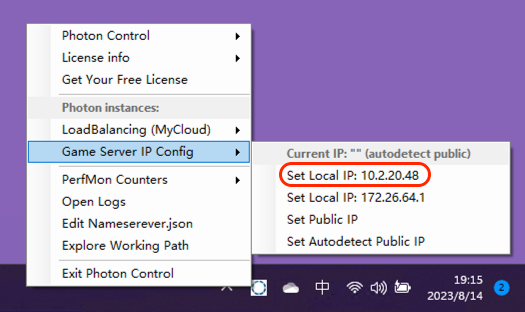
  4. To connect clients from a local network, simulated device or the public internet, change the IP Address Config. The next steps are to set up the method for local network. (Use one local host as a server, and then connect other client devices to the same Wi-Fi as that server.)

  5. In Unity, open PhotonServerSettings (Window > Photon Unity Networking, then click Locate PhotonServerSettings)

  1. Modify PhotonServerSettings: unselect "Use Name Server", fill in the IP address and port number of the self-hosted server (if using UDP protocol, the default port number is 5055).

    You can find your local server IP here:

  1. Modify the PublicIpAddress field in GameServer.xml.config to the IP address of the self-hosted server (default is 127.0.0.1). You can find this file in: deploy\LoadBalancing\GameServer\bin

3. Joining a room

A crucial prerequisite for sharing an anchor among different users is that they are in the same room. Therefore, we need to set up a script to allow them to join the same room.

The joinedRoomIndicator is used to indicate a successful room joining. The method used here is to change the color of the join button after successfully joining.

using UnityEngine;
using Photon.Pun;
using Photon.Realtime;
using UnityEngine.UI;

public class JoinRoomButton : MonoBehaviourPunCallbacks
{
    public Button joinedRoomIndicator;

    public void OnButtonClick()
    {
        // Connect to the Photon master server
        if (!PhotonNetwork.IsConnected)
        {
            PhotonNetwork.ConnectUsingSettings();
        }
        else
        {
            TryJoinRoom();
        }
    }

    public override void OnConnectedToMaster()
    {
        Debug.Log("Connected to Photon master server");
        TryJoinRoom();
    }

    private void TryJoinRoom()
    {
        // Try to join the room "MyRoom"
        PhotonNetwork.JoinRoom("MyRoom");
    }

    public override void OnJoinedRoom()
    {
        Debug.Log("Joined room: " + PhotonNetwork.CurrentRoom.Name);
        
        joinedRoomIndicator.image.color = Color.green;
    }

    public override void OnJoinRoomFailed(short returnCode, string message)
    {
        Debug.Log("Failed to join room");
        // If we failed to join the room, it might not exist, so let's try to create it
        PhotonNetwork.CreateRoom("MyRoom");
    }

    public override void OnCreatedRoom()
    {
        Debug.Log("Created room: " + PhotonNetwork.CurrentRoom.Name);
    }

    public override void OnCreateRoomFailed(short returnCode, string message)
    {
        Debug.Log("Failed to create room");
    }
}

Register and create a new application on the , then obtain the App ID for your application.

Note that the self-hosted server is only compatible with Windows operating systems. For details, please refer to the .

Download and extract the server package to any place - preferably an empty folder which you prepared beforehand.

Get a , claim it and save it to "deploy\bin_Win64".

official website of Photon
official document of photon
Photon Server SDK
license